

Affiliate Disclosure: This post may contain affiliate links, which means I may earn a small commission if you purchase through those links at no extra cost to you. I only recommend products and services I personally use or believe add value. Thank you for supporting AlexTripp.tech!
I wanted my smart home dashboard to feel… smarter.
Specifically, I didn’t want the screen glowing all day on my wall. I wanted it to wake up when someone walked by, then go to sleep when no one was around. A nice, clean, efficient wallboard.

So I gave ChatGPT a prompt:
“Write a Python script that turns a screen on with a PIR sensor and publishes motion to MQTT for Home Assistant for my Raspberry PI 5.” (Raspberry PI 5 part is important due to some differences as I understand it around GPIO addressing.)
It did exactly that. I asked follow-ups. It refined the code. I added my wiring details. It added real-time screen state detection. Before I knew it, I had a working automation pipeline: PIR sensor → Raspberry Pi → MQTT → Home Assistant → auto screen control.
This post walks through how I turned that conversation into a reliable, production-ready part of my home.
Why I Needed This
I’ve got a Raspberry Pi running a smart dashboard — full-screen Chromium in kiosk mode showing Home Assistant. It gives me fast access to lights, sensors, climate, and cameras. But I didn’t want the screen on 24/7.
I wanted:
- The display to wake up instantly when someone walks near it.
- To publish those motion events to Home Assistant over MQTT.
- The screen to turn off after 5 minutes of inactivi…
- A setup that survives reboots and doesn’t break under weird edge cases.
And I didn’t want to hunt through six forums and a pile of broken StackOverflow answers to do it.
What I Used
- Raspberry Pi 5, running Raspberry Pi OS Desktop (X11)
- A simple PIR sensor (motion detector) wired to GPIO 17. I used a cheap AM312 mini detector from Amazon.
- An HDMI touchscreen display
- MQTT broker (Mosquitto via Home Assistant add-on)
- ChatGPT to write and iterate the Python + systemd setup

What ChatGPT Did (That Saved Me Hours)
- Wrote the full Python script using gpiozero and paho-mqtt
- Used xset to control screen power and xset q to check state
- Automatically published ON and OFF to MQTT (with customizable timeouts)
- Set up systemd to run it reliably at boot with the correct X11 permissions
- Helped troubleshoot when xset silently failed due to missing environment vars
Every time something didn’t work, I pasted the error back in and it walked me through troubleshooting steps to find out where the code or configuration was broken and then helped me fix it.
The Code
In order to set this up you will have to add the code and switch out variables to meet your needs. You will also need to install GPIOzero and paho-mqtt as they are dependencies. Once I had those installed, I simply created a file called pir_wake.py (sudo nano pir_wake.py) in my Raspberry Pi’s home directory. Then pasted in my code. Here is the final code. You can also view it on GitHub here.
from gpiozero import MotionSensor
from signal import pause
import subprocess
import time
import threading
import paho.mqtt.client as mqtt

# === Configuration ===
PIR_GPIO = 17 #Make sure to set the correct pin for the PIR sensor
MQTT_BROKER = "192.168.1.2" #Add your MQTT IP here
MQTT_PORT = 1883
MQTT_USERNAME = "mqtt" #Change to your MQTT username
MQTT_PASSWORD = "mqttpassword" #Change to your MQTT password

MQTT_TOPIC_STATE = "rpi5/motion"
MQTT_TOPIC_AVAIL = "rpi5/motion/availability"
MQTT_CLIENT_ID = "rpi5-motion-sensor"

MQTT_RESET_TIMEOUT = 30
SCREEN_OFF_TIMEOUT = 300

# === X11 Environment Variables ===
X11_ENV = {
    "DISPLAY": ":0",
    "XAUTHORITY": "/home/pi/.Xauthority" #If you have a different user then you will need to change from "pi" to whatever that username is
}

# === State Variables ===
last_motion_time = time.time()
mqtt_state_on = False

# === MQTT Setup ===
def on_connect(client, userdata, flags, rc):
    print(f"[MQTT] Connected with result code {rc}")
    client.publish(MQTT_TOPIC_AVAIL, "online", retain=True)

print("📡 Setting up MQTT client...")
client = mqtt.Client(MQTT_CLIENT_ID)
client.username_pw_set(MQTT_USERNAME, MQTT_PASSWORD)
client.will_set(MQTT_TOPIC_AVAIL, "offline", retain=True)
client.on_connect = on_connect
client.connect(MQTT_BROKER, MQTT_PORT, 60)
client.loop_start()

# === Helpers ===

def is_screen_on():
    try:
        result = subprocess.run(
            ["xset", "q"],
            env=X11_ENV,
            capture_output=True,
            text=True
        )
        return "Monitor is On" in result.stdout
    except Exception as e:
        print(f"⚠️ Could not determine screen state: {e}")
        return True  # assume on if unsure

def publish_motion(state):
    print(f"[MQTT] Publishing motion state: {state}")
    client.publish(MQTT_TOPIC_STATE, state, retain=True)

def turn_on_display():
    global last_motion_time, mqtt_state_on
    last_motion_time = time.time()

    print("💡 Motion detected. Entering turn_on_display()")
    print("🔍 Environment:")
    print(f"  DISPLAY = {X11_ENV.get('DISPLAY')}")
    print(f"  XAUTHORITY = {X11_ENV.get('XAUTHORITY')}")

    screen_now_on = is_screen_on()
    print(f"🖥️ Actual screen state: {'on' if screen_now_on else 'off'}")

    if not screen_now_on:
        print("🔧 Attempting to turn ON display...")
        try:
            result = subprocess.run(
                ["xset", "dpms", "force", "on"],
                env=X11_ENV,
                capture_output=True,
                text=True
            )
            print(f"✅ xset return code: {result.returncode}")
            print(f"stdout: {result.stdout.strip()}")
            print(f"stderr: {result.stderr.strip()}")
        except Exception as e:
            print(f"❌ Exception while running xset: {e}")
    else:
        print("🟡 Screen already on — skipping xset")

    if not mqtt_state_on:
        print("📡 Sending MQTT motion ON...")
        publish_motion("ON")
        mqtt_state_on = True
    else:
        print("🟢 MQTT already ON — skipping publish")

def turn_off_display():
    print("🌙 Checking if screen needs to be turned OFF...")
    if is_screen_on():
        print("🔧 Turning OFF display via xset...")
        try:
            result = subprocess.run(
                ["xset", "dpms", "force", "off"],
                env=X11_ENV,
                capture_output=True,
                text=True
            )
            print(f"✅ xset return code: {result.returncode}")
            print(f"stdout: {result.stdout.strip()}")
            print(f"stderr: {result.stderr.strip()}")
        except Exception as e:
            print(f"❌ Exception while running xset: {e}")
    else:
        print("🟡 Screen already off — skipping xset")

def monitor_inactivity():
    global mqtt_state_on
    while True:
        idle_time = time.time() - last_motion_time

        if mqtt_state_on and idle_time > MQTT_RESET_TIMEOUT:
            print(f"📉 No motion for {MQTT_RESET_TIMEOUT}s. Sending MQTT OFF...")
            publish_motion("OFF")
            mqtt_state_on = False

        if idle_time > SCREEN_OFF_TIMEOUT:
            print(f"⏲️ No activity for {SCREEN_OFF_TIMEOUT}s. Triggering screen off...")
            turn_off_display()

        time.sleep(2)

# === Main Execution ===

print("🚀 Starting PIR + MQTT screen controller script...")

try:
    pir = MotionSensor(PIR_GPIO)
    pir.when_motion = turn_on_display
    print("✅ PIR motion callback registered.")
except Exception as e:
    print(f"❌ Failed to initialize PIR sensor: {e}")

threading.Thread(target=monitor_inactivity, daemon=True).start()

pause()
It’s actually a little funny that you can tell it was AI coded due to the inclusion of all the emojis. I wouldn’t have included those but now they are there :).
The Workflow
Here’s what happens:
- PIR sensor detects motion → script wakes the display via xset
- MQTT message is published: kitchen/motion → ON
- If no motion for 30 seconds → MQTT message becomes OFF
- If no motion for 5 minutes → screen powers off
- All of this runs quietly via a systemd service at boot
Home Assistant Integration
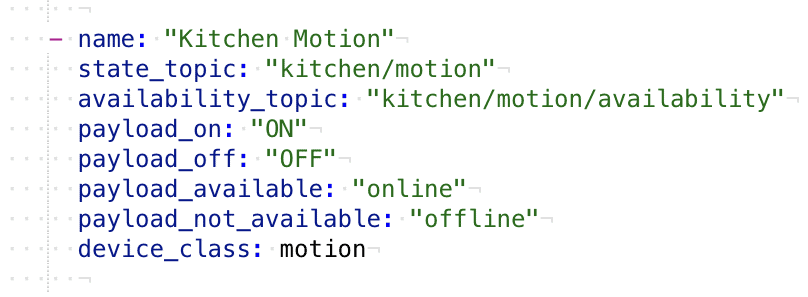
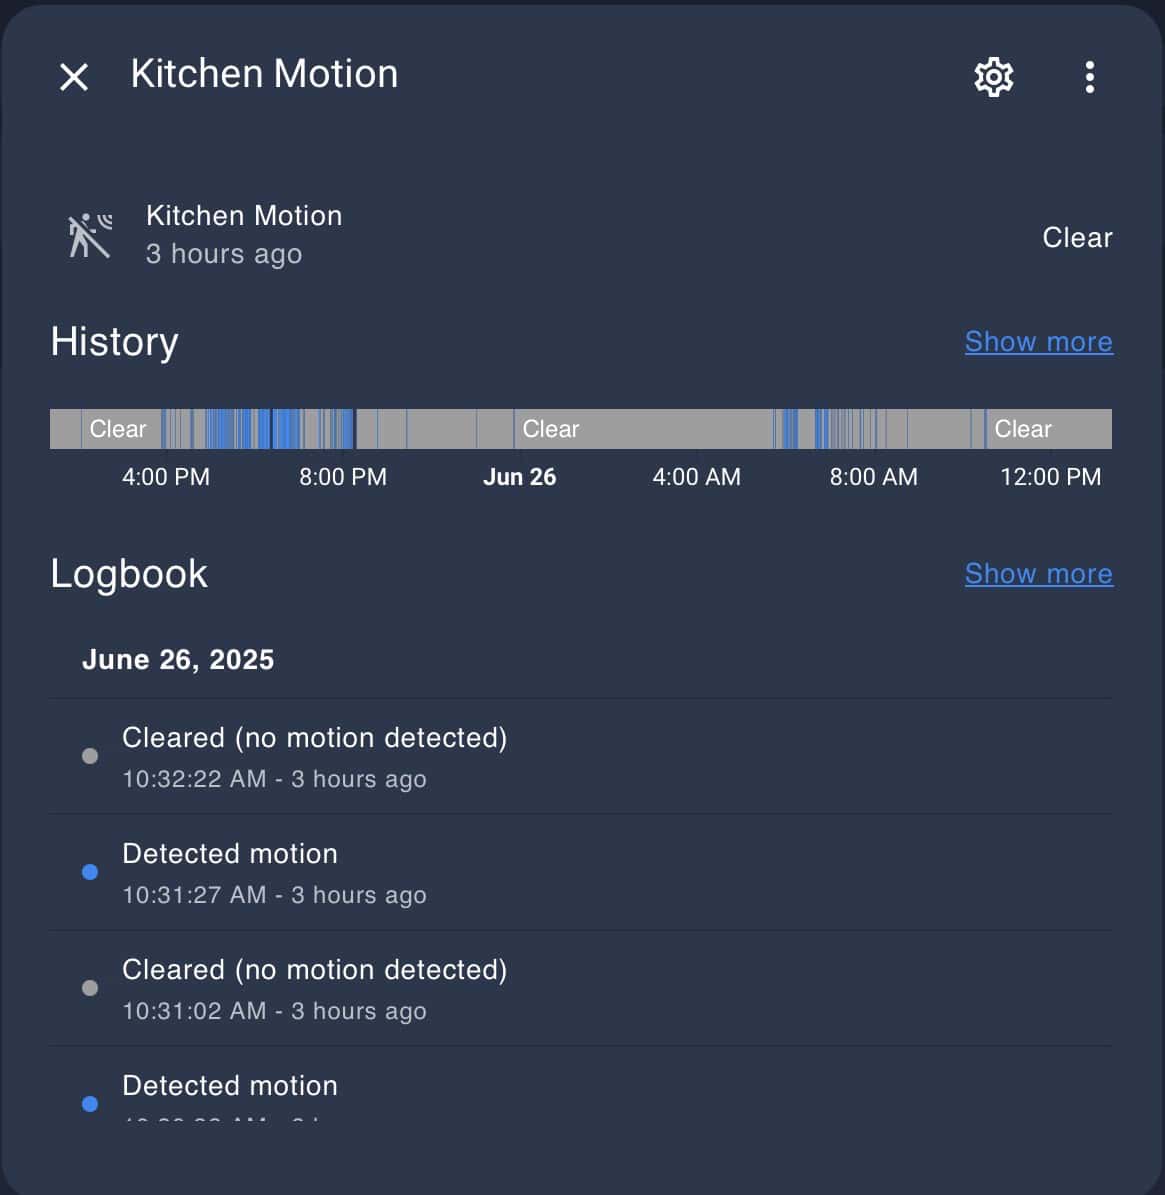
My Home Assistant instance is where my MQTT server lies. Once I added the configuration information in the code I then setup a binary sensor in Home Assistant. In configuration.yaml, I added this:
  binary_sensor:
    - name: "Kitchen Motion"
      state_topic: "kitchen/motion"
      availability_topic: "kitchen/motion/availability"
      payload_on: "ON"
      payload_off: "OFF"
      payload_available: "online"
      payload_not_available: "offline"
      device_class: motion
Now I can:
- See motion status for my kitchen in Home Assistant.
- Use it in automations (e.g., trigger kitchen lights).
- Know if the Pi went offline.
What Made This Work
The final version of the script didn’t just blindly assume the screen state. It used xset q to ask the screen if it was already on, avoiding unnecessary wake commands. That made the whole setup feel seamless and low-power.
It also published availability to Home Assistant via MQTT, so I can see if the device is live.
And it includes robust logging, so I know exactly what’s happening — motion seen, screen toggled, MQTT state changed — all in the logs. This was extremely useful when I was trying to troubleshoot a few issues earlier on. Outputs on nearly every line helps me to test the script and see if anything is happening and if not, why not.

Running at Boot
ChatGPT also wrote me a clean systemd service file:
[Unit]
Description=Motion Sensor Display Wake with MQTT
After=graphical.target
Wants=graphical.target

[Service]
Type=simple
User=pi
WorkingDirectory=/home/pi
ExecStart=/usr/bin/python3 /home/pi/pir_display_mqtt_debug.py
Restart=on-failure
Environment=DISPLAY=:0
Environment=XAUTHORITY=/home/pi/.Xauthority

[Install]
WantedBy=graphical.target
Final Thoughts
This whole project is a great example of what I find AI useful for right now. I knew what I wanted — but I didn’t want to spend half a day figuring out the exact quirks of screen control on a Raspberry Pi running X11. I know enough to debug and read code, but not enough of the basics to get started.
ChatGPT helped me write clean, maintainable code that worked. I still had to wire the sensor, understand the flow, and tweak values — but I didn’t waste time reinventing the wheel.
If you’re building a smart dashboard, tablet interface, or wallboard — this setup might be the perfect fit for you.