

Affiliate Disclosure: This post may contain affiliate links, which means I may earn a small commission if you purchase through those links at no extra cost to you. I only recommend products and services I personally use or believe add value. Thank you for supporting AlexTripp.tech!
After successfully tracking my gas usage using a software-defined radio dongle, I set my sights on another utility: water. Unlike gas meters that emit radio signals, my water meter doesn’t broadcast usage wirelessly. Or maybe it does, but my dongle did not pick up anything resembling water usage data. Instead, I turned to a more visual solution—using a small AI-enabled camera to read my meter for me. Enter: the AI-on-the-Edge device project.
This setup uses an ESP32-CAM module running a lightweight image recognition system to take snapshots of my water meter and extract usage data. That data then gets sent into Home Assistant where I can visualize trends, detect unusual activity, and maybe even save a little water along the way.
What is AI-on-the-Edge?
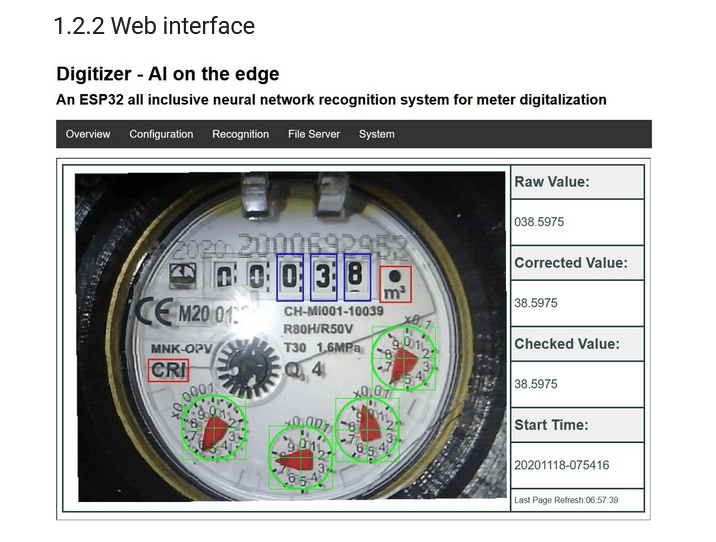
The AI-on-the-Edge Device project is an open-source firmware designed for ESP32-CAM boards. It captures images from analog or digital utility meters and uses OCR (optical character recognition) to convert what it sees into usable numbers.

Think of it like giving your home automation system a pair of eyes, except they cost under $15 and fit in the palm of your hand.
The firmware is impressively capable, with features like:
• Scheduled image captures
• MQTT publishing
• Web-based configuration
• Support for both analog dials and digital displays
My Setup
To track my water usage, I used the following hardware:
• ESP32-CAM-MB: A small microcontroller with a built-in camera and microSD card slot
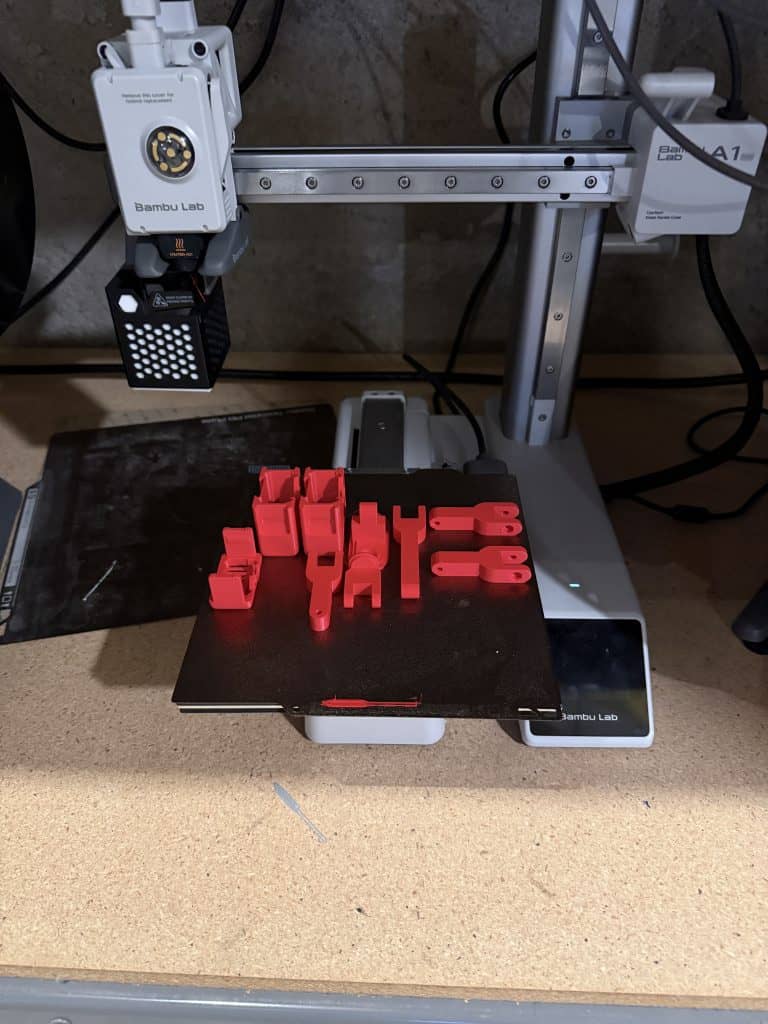
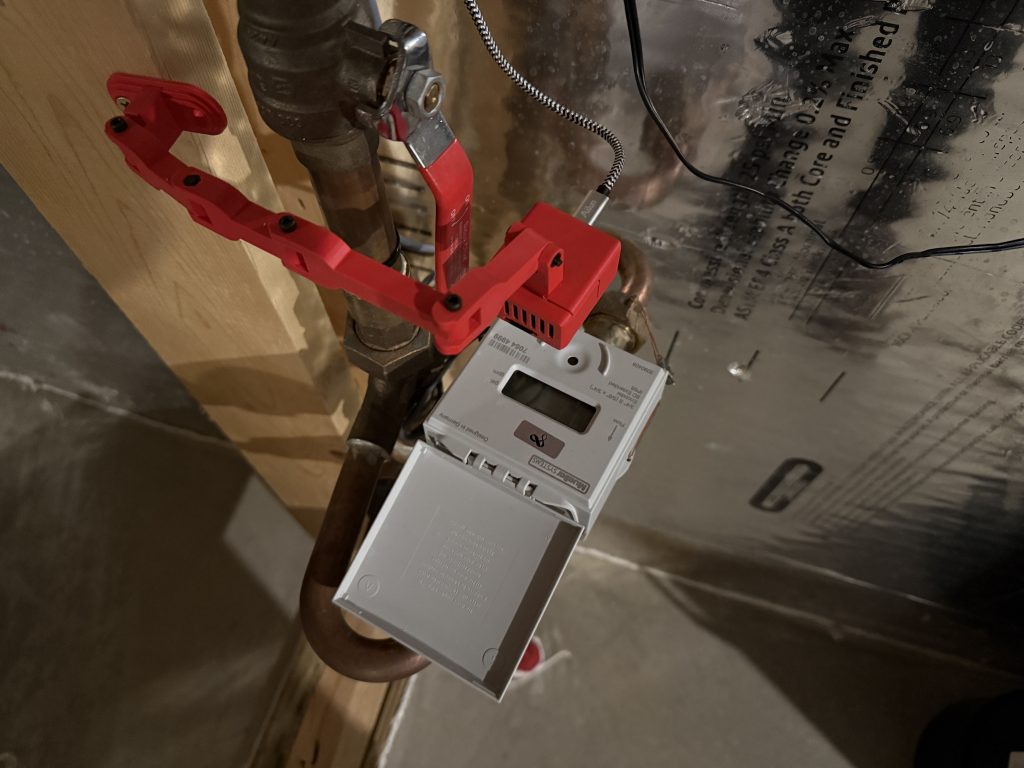
• Custom 3D printed mount: Designed to hold the ESP32-CAM in place over my water meter
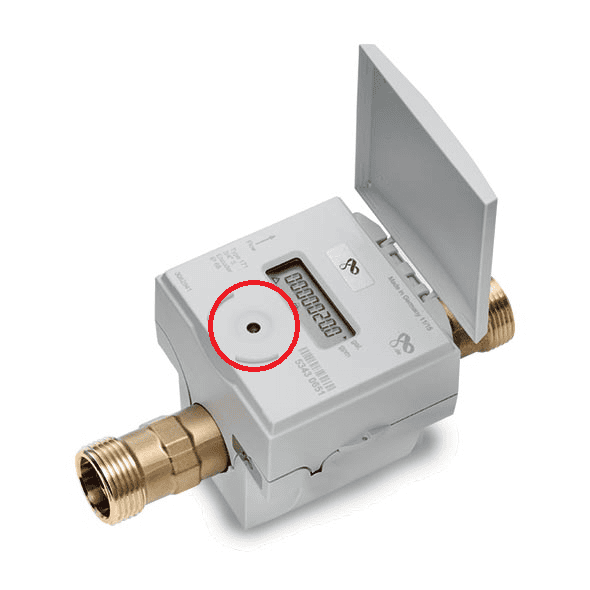
• Mueller Systems SSM digital water meter: This is the type of water meter installed by my city
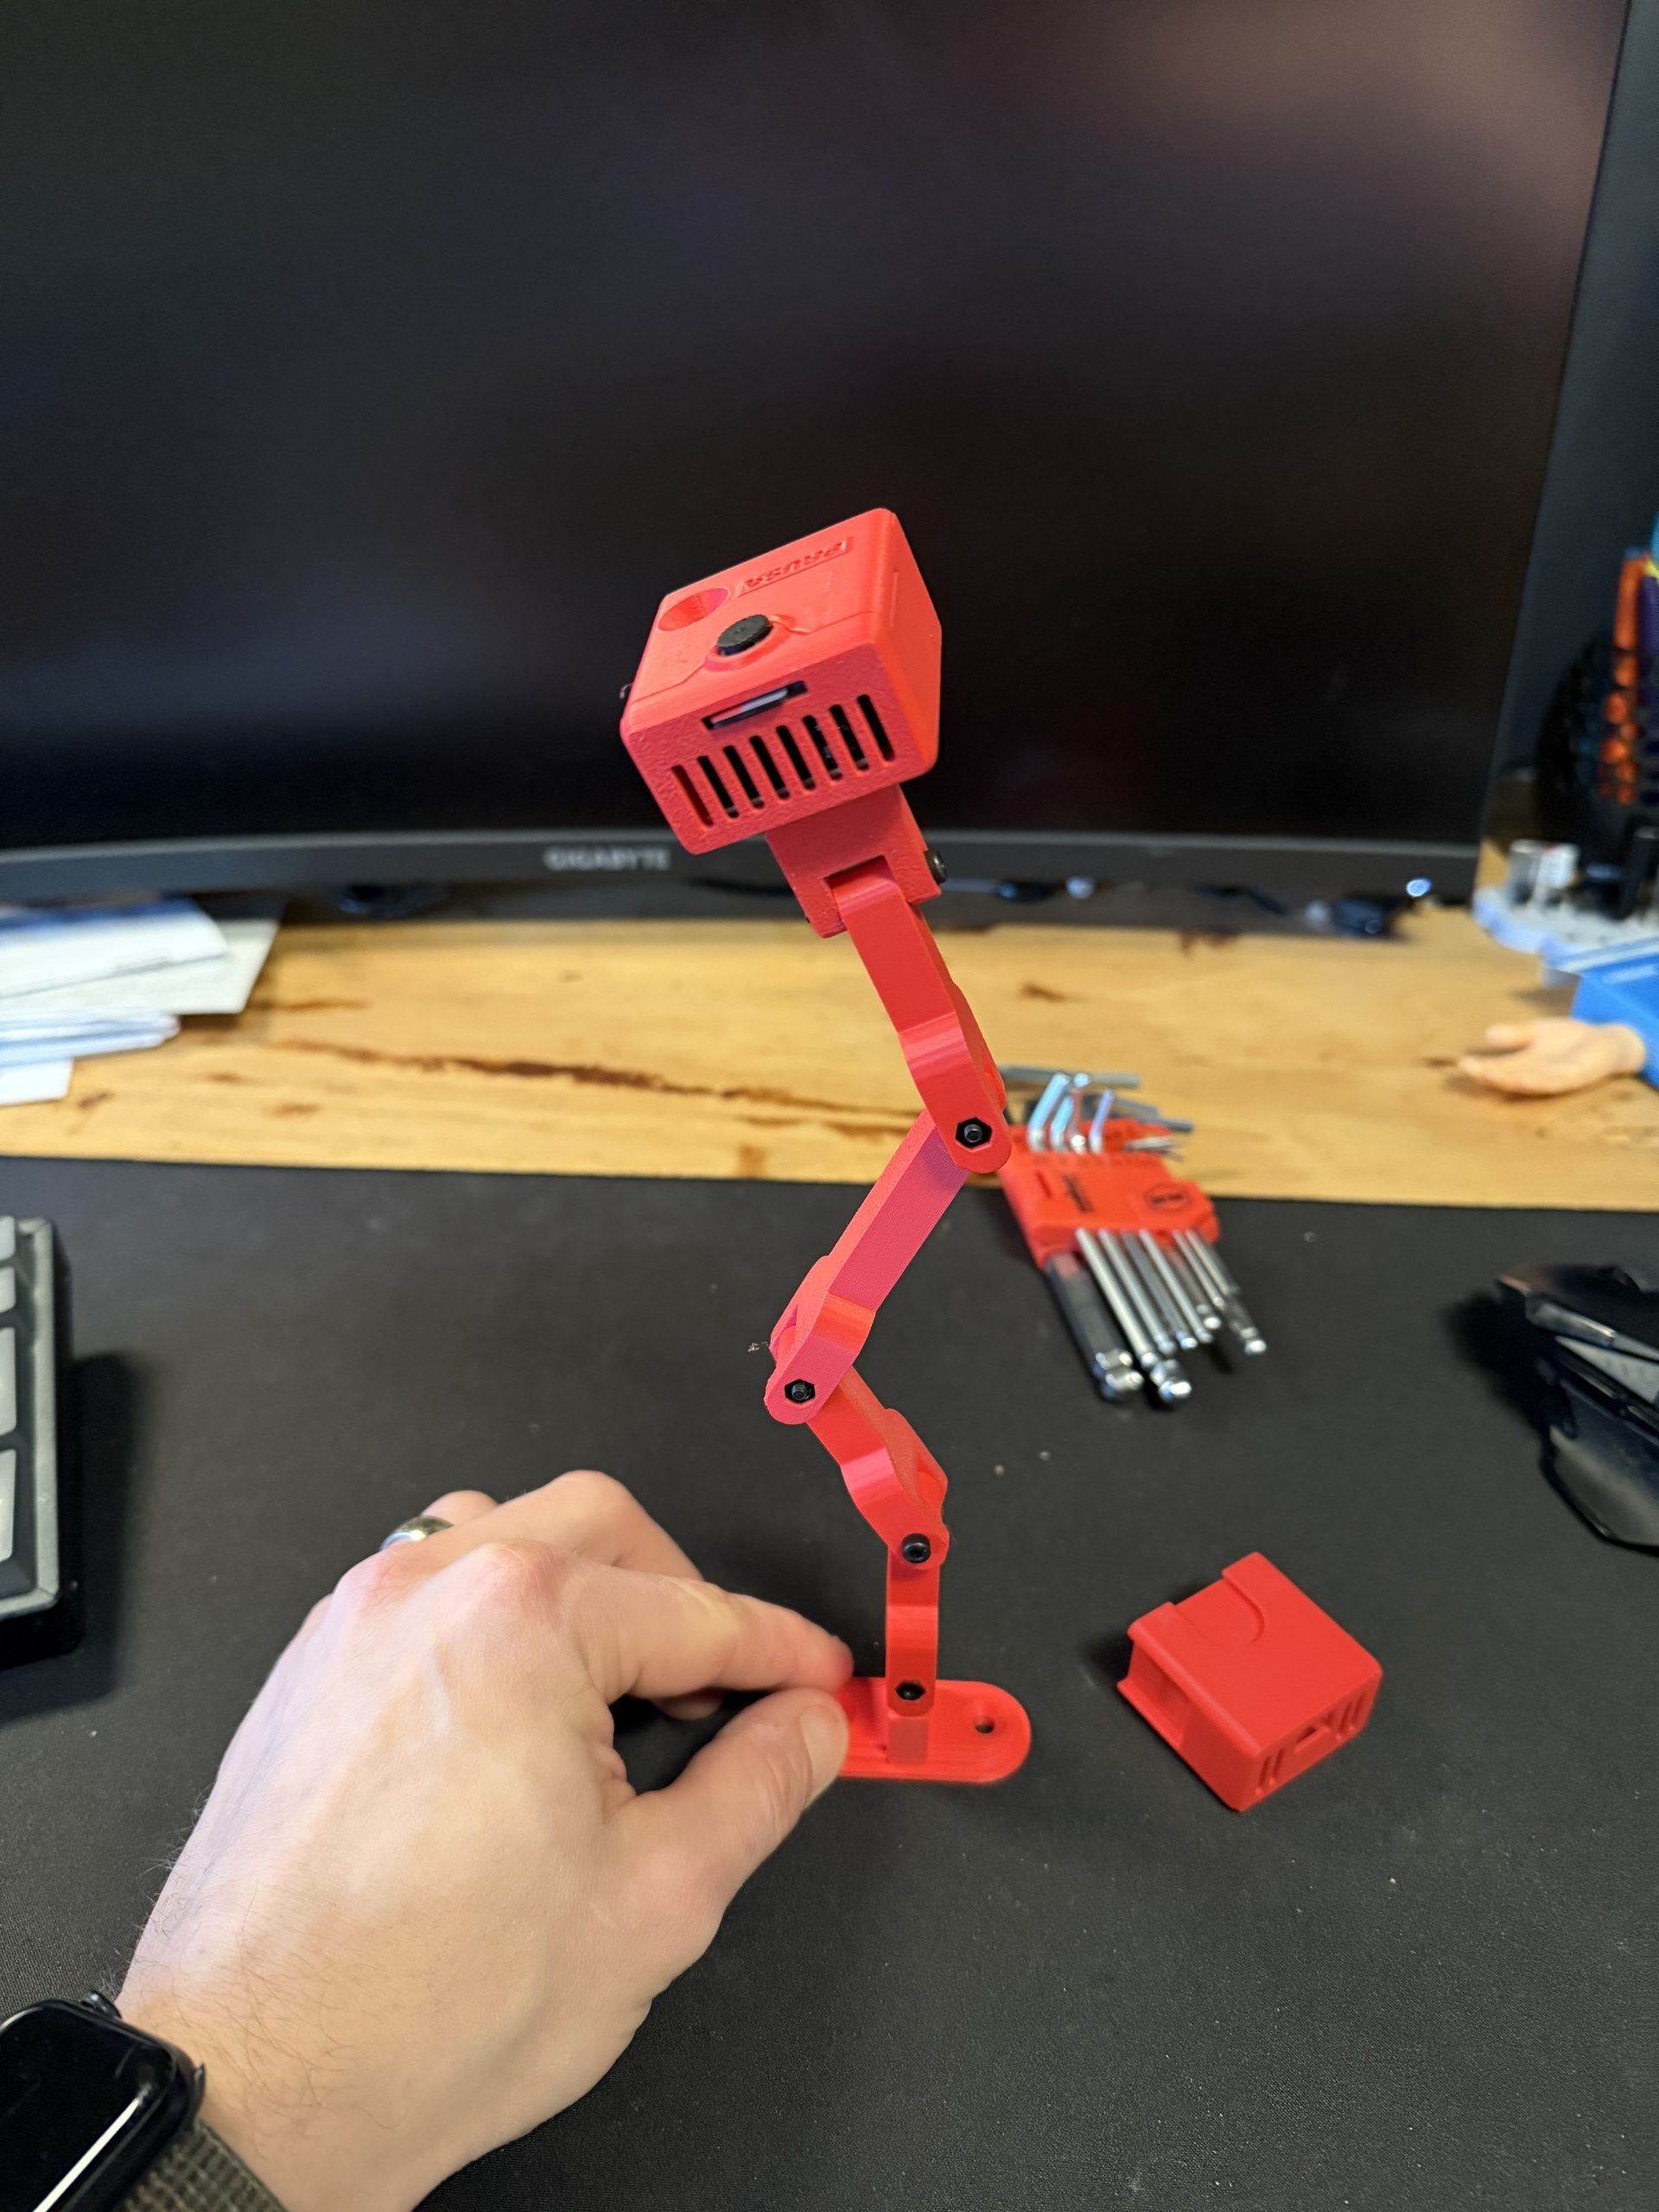
The board is powered via USB and connected to my home Wi-Fi. It’s mounted directly above the digital readout of the water meter using the 3D-printed bracket, ensuring the camera has a clear and consistent view of the numbers.
The Big Challenge: Flash vs. Optical Sensor
This is where things got tricky.
My water meter has a built-in optical sensor that cycles through different display modes when triggered. Unfortunately, the flash on the ESP32-CAM was enough to set it off, which could cause the meter to switch screens right as the image was captured. This would lead to it trying to capture the wrong data and sending nothing to Home Assistant due to a mismatch from the last capture.
To get around this, I had to experiment:
• Check what the timeout was on the meter. It seemed to reset (turn off) after a minute.
• Was the flash enough to trip the sensor and turn on the first screen (current usage)?
• Would the long flash (about 2-3 seconds) trip it and push it past the usage screen?
Eventually, I found that the time between captures (3 minutes) was enough for the meter to turn the screen off, the flash on the next capture would turn it on, and I’d get a good picture of the data. The nice part about the AI-on-the-edge firmware is that if the usage number it finds is not within a range of the last capture (example is if the optical sensor tripped further and showed the gallons per minute number) then it won’t commit it and communicate it with Home Assistant.
Setting up AI-on-the-Edge
I am not going to dive deep into how to flash the ESP32-CAM. Essentially I ordered This Serial Module from Amazon and then followed the instructions here.
There are a few steps once you have the firmware installed, connected to WiFi and have navigated to the firmware’s webpage from another computer:
Reference Image and Settings
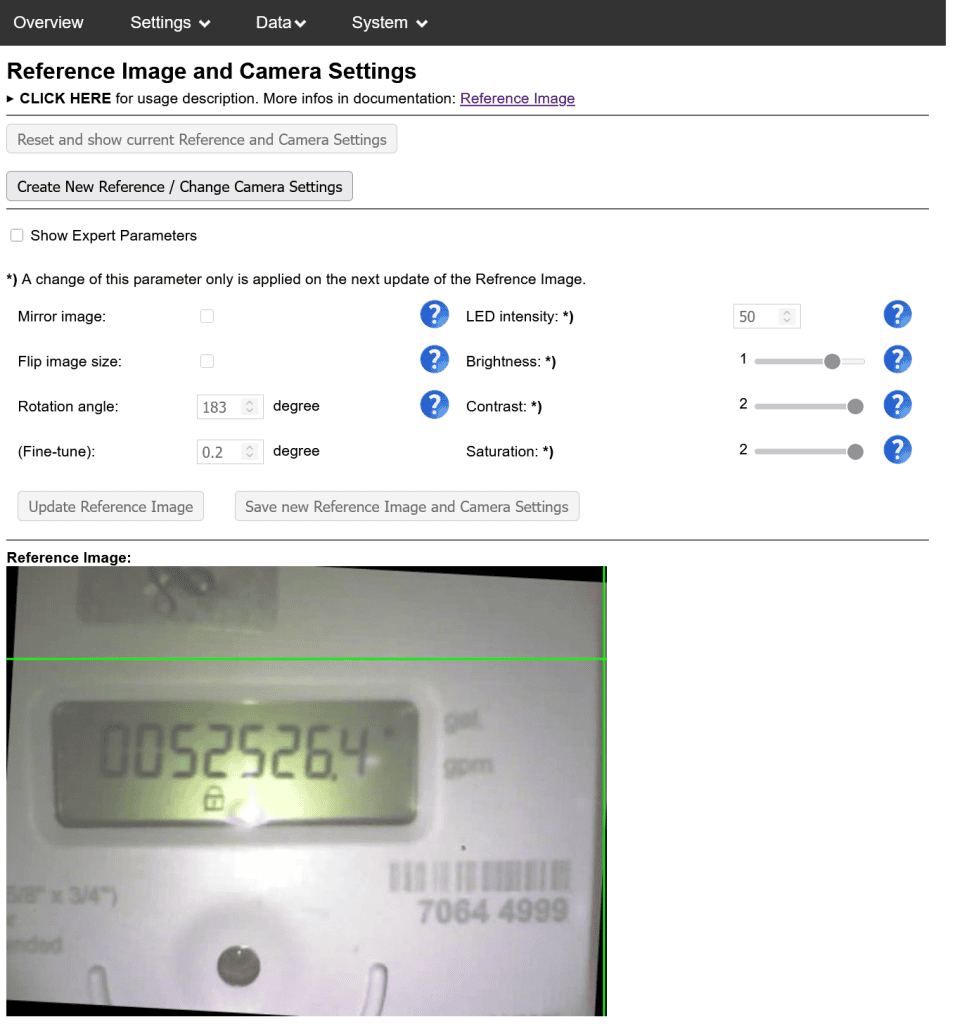
Once in the web page, head over to Settings>Alignment>Reference Image and Camera Settings. This is where we make sure we are getting a good image. The main things you want to do here:
- Create New Reference
- Once that image comes through it’s best to straighten it out. You can fine tune the rotation angle by tenths to get it just right.
- Play with the LED intensity and other brightness settings to get a really clean picture.
Once you’ve set these you can click on “Save new Reference Image and Camera Settings”.
Alignment Markers
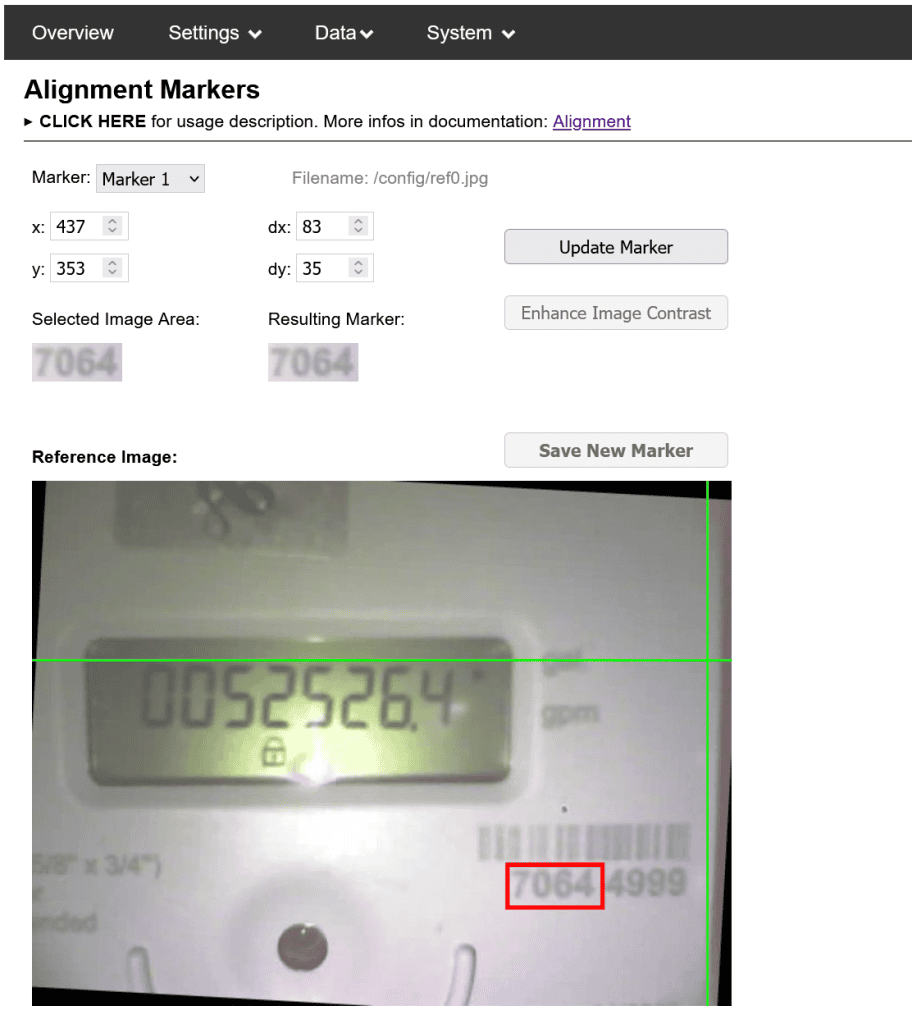
Now we need to head over to our next setting. Go to Settings>Alignment>Alignment Markers. Here you will need to set two bits of text that the firmware can use to make sure the image is aligned.
- Use your mouse to outline a block of text or other major feature (not the actual digits you want to read).
- Click update marker.
- Click Save New Marker.
- Repeat for Marker 2.
Regions of Interest
Getting closer! Now let’s head to Settings>Regions of Interest (ROIs)>Digit ROIs. If you have a dial meter then head over to Analog ROIs. From here you need to create as many ROIs as you have digits. I have eight ROIs to cover seven main digits and one tenths digit.
Once you’ve created the ROIs you need to use your mouse to highlight your first one. Make sure you get that first digit fully encapsulated by the red box. From here I like to go to the drop down and select dig2, and then adjust my x position by adjusting the number to fine tune digit 2. So on and so on until you have all digits covered like below:
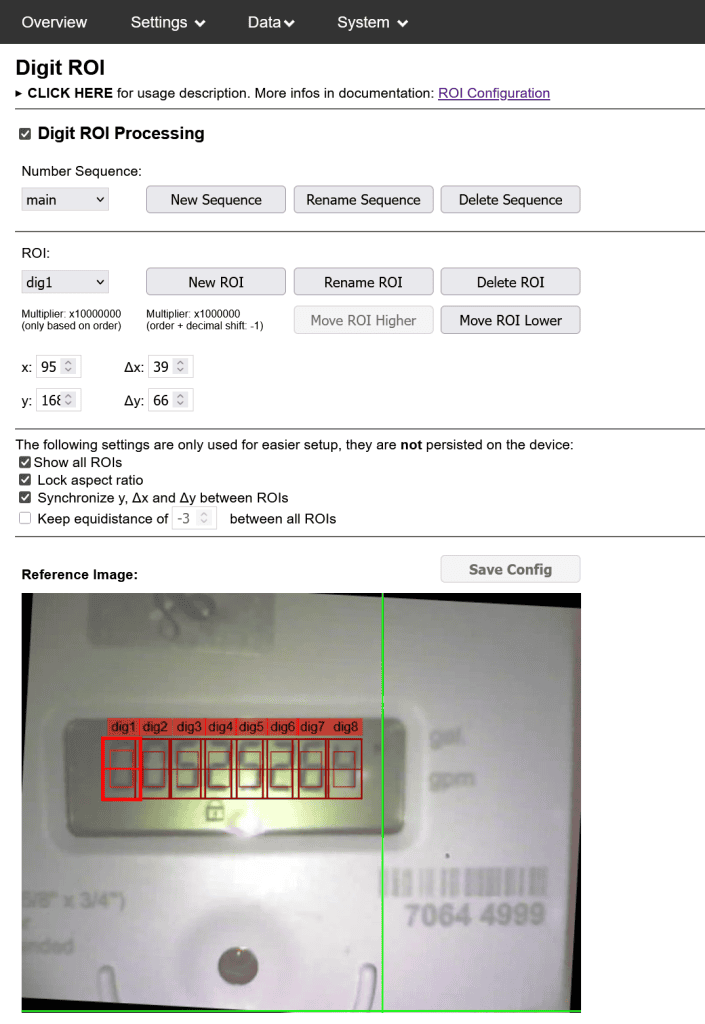
Once this is done you are nearly there. Head over to System>Reboot and reboot the board. Once it comes back up, you’ll either be collecting data or you wont. If you are having trouble, be sure to check the docs here for more help.
Integrating with Home Assistant
Once I had the image capture and OCR working reliably, the next step was getting the data into Home Assistant.
Thankfully, the AI-on-the-Edge firmware includes native support for MQTT, which made this part easy. After configuring my MQTT broker and pointing the ESP32 device to it, the water usage data began streaming in.
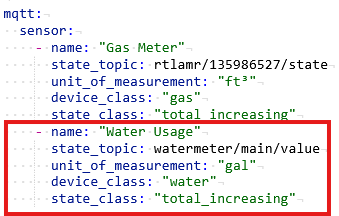
In Home Assistant, the data appears as a sensor that I can chart over time, trigger automations with, or use to build custom dashboards.
Here is the entity I setup on the Home Assistant side and the setup on the AI-on-the-Edge firmware:

What I’ve Learned
This setup has already taught me a few interesting things about our household water usage:
• Water is relatively cheap. Compared to my gas bill, the cost of water is surprisingly low—at least in my area.
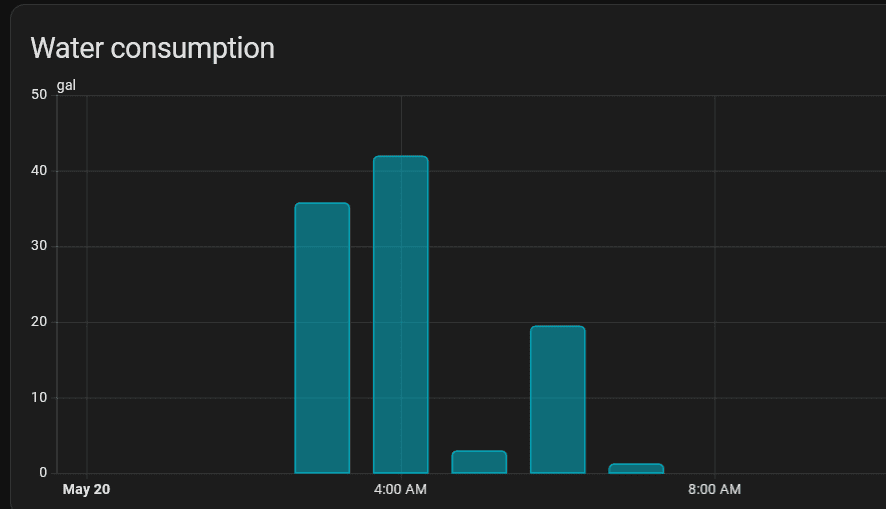
• My water softener runs every few days at around 3–4 a.m. I knew this is the time it is set to run, but by tracking the trend of how often it runs, I can understand how often it’s recharging and potentially plan salt purchases based on water usage.
• Showers generally use about 20 gallons. For some reason, I just assumed they used a lot more but this is a pretty regular usage number I see in the mornings.
These insights aren’t just nerdy fun—they’ve helped me build a baseline understanding of our day-to-day water habits. What’s going to be interesting here shortly is seeing how much water we use when watering our lawn. This new house came with a sprinkler system, so once we get it setup, it will be interesting to see what our usage is like and tweak it so our grass stays green on the most efficient amount of water.
What’s Next?
While I haven’t set up any major automations just yet, I’m starting to brainstorm:
• Leak detection based on continuous usage – if we use a hundred gallons in a short time frame, that might be indicative of a leak. I need to do some research on what other Home Assistant users are doing.
• Notification that softener salt might be low. If I can peg the number of regenerations/bag, I could potentially warn myself that salt may be needed shortly.
• Alerts if someone is taking really long showers. This may be a future use case when my kids get a bit older.
There’s a lot of potential here, and I’m just scratching the surface. If you’ve used AI-on-the-Edge or have ideas for water-based automations, I’d love to hear them.
Wrap-Up
This was a fun and surprisingly straightforward DIY project. The combination of a cheap ESP32-CAM board and clever open-source software turned my “dumb” water meter into a connected sensor that’s now a full part of my smart home system.
If you’re already tracking power and gas, water is a logical next step—and the AI-on-the-Edge device makes it easier than you might think.